Difference between revisions of "User:PigeonGuru/Sandbox"
PigeonGuru (talk | contribs) |
PigeonGuru (talk | contribs) |
||
| Line 8: | Line 8: | ||
http://rimworldwiki.com/index.php?title=Template:Nav/guides <br> | http://rimworldwiki.com/index.php?title=Template:Nav/guides <br> | ||
| + | http://rimworldwiki.com/index.php?title=Template:Infobox main <br> | ||
http://rimworldwiki.com/wiki/Category:Page_Deletion | http://rimworldwiki.com/wiki/Category:Page_Deletion | ||
Revision as of 11:58, 3 November 2018
marmine helmet
template
http://rimworldwiki.com/index.php?title=Template:Nav/guides
http://rimworldwiki.com/index.php?title=Template:Infobox main
http://rimworldwiki.com/wiki/Category:Page_Deletion
save file
C:\Users\%username%\AppData\LocalLow\Ludeon Studios\RimWorld by Ludeon Studios\Saves
°C
old d.tactics is @ ~140,000 views
Battle tactics
You can face off your opponents by employing a variety of clever tactics.
Spacing out
Each colonist should ideally stand 1 tile away from other colonists, thus reducing the chance of enemy bullets hitting somebody else after missing the original target, which deals a lot of damage to static grouped up defenders.
Explosives will also hit fewer people this way, though there are better countermeasures than simply spacing defenders apart.
Blocking enemies

Enemies can be physically blocked by colonists or animals, denying them access to locations. This can be done to a significant tactical advantage.
Heavily armored soldiers are needed to body block active combatants, as they will take a lot of hits while blocking, and even so they will eventually collapse due to sustained damage. They should also be able to deal heavy damage at point-blank.
Blocking can be used to slow down prison breaks, seal off escape routes for enemies, or more aggressively to devastate melee only raids, detailed below.
Melee blocking
When faced with a full melee attack, instead of engaging enemies on the frontline, retreat behind your walls, and open doors to use as chokepoints. Leave up to three melee brawlers standing right behind the doors to block enemies while cutting them down, stationing more nearby as replacements, and gunners behind to fire on the intruders. This forces enemies to trickle in and fight with your soldiers one-by-one, making them significantly easier to dispatch of. Make sure all brawlers are shielded to block friendly fire.
This is a horribly effective way to defeat melee attacks. Compared to a regular frontline defense, this tactic significantly reduces the casualties your side will sustain. You also don't need to build anything special for this purpose- any opening or door in the wall will do.
For maximum pain, use high-DPS guns for your backline for bringing the hurt, combined with quality melee for your frontline to deal sustained damage in between barrages.
Combined with measures to force enemies into close range, it works wonders against ranged enemies as well, but beware as enemies can still fire until you start beating them up.
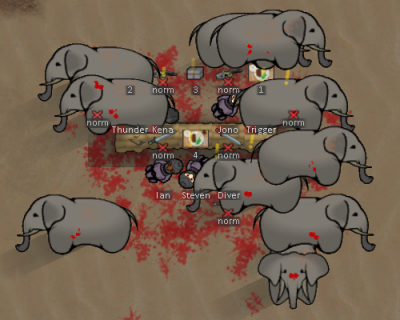
10 manhunter elephants vs 3 armored brawlers and 4 armored gunners; all colonists are downed while all elephants remain standing.
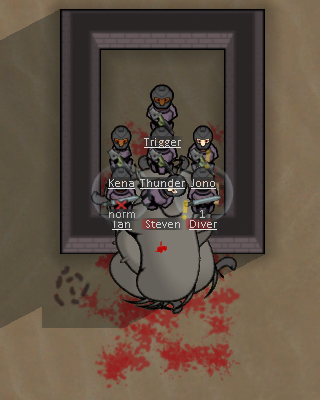
Same situation but with melee blocking; only 1 colonist downed, and all elephants defeated.


Tanking
This tactic simply requires you put your shielded colonists before your static gunners to partially soak up gunfire. This is best when you have insufficient cover, or additional cover to block more bullets for your frontline tanks.
As with any tactic involving meat shields, this poses a great risk to colonists' lives. If the colonists' shields are downed and they are not well-armored, you will have to get them to retreat behind cover until their shields come back online, otherwise your colonist will be exposed to ruthless gunfire.
Beware of high damage-per-hit weapons which can instantly down shields.
Distracting rockets
Rocket launchers are painful to deal with, due to the huge damage they deal to a massive area. In the mid-late game they are one of the biggest threats from the enemy.
The best way to deal with them is to distract them to fire elsewhere, in order to greatly reduce the amount of damage received.
Raiders with rocket launchers are often seen in the backline preparing their rockets, while their allies lay down fire at the front. They get distracted quite easily, wasting them on animals or lone colonists. This can be exploited simply by charging them with melee units, which will cause them to fire it towards them and away from the rest of your forces. They may fire at point-blank, injuring many of his comrades and themselves. If you're fast, you can even intercept them before they can aim their rocket launcher, forcing them into hand-to-hand combat, eventually overwhelming them and yielding the launcher which can be captured for future use.
This is a high-risk but necessary move to take, and some pawns may need to be sacrificed.
You have to make that colonist the only available target for them to consider attacking. If they have a better target with less possible friendly fire, they will attack them instead. To combat this, have all your other units, including animals, stay completely out of range until the rocket launchers have been neutralized.
Shielded unit deployment
Deploy brawlers equipped with shield belts and heavy armor, letting the shields block the blast as well as some gunfire. As soon as all rocketeers have discharged or shields are broken, quickly return to cover. Colonists should keep moving while distracting, especially when facing triple rocket launchers.
Be prepared to sacrifice someone, as their shields are very likely to be broken whether by the blasts or concentrated gunfire, exposing the colonist within.
Expendable animal charge
Have animals that are both expendable and fast charge the enemy, rocket soldiers included. It's especially good if the animals can survive a rocket blast, as it allows them to continue distracting any further rocket launches or enemy fire.
For multiple rocket launchers, send animals in batches, such as by assigning animals to different handlers and setting them to attack at different times, to prevent them from being wiped out by a single blast.
While they do not need to be obedience- or release-trained, as you can use animal area zones to force them into areas, this method is less effective as animals have a delay before moving into their assigned zones and may be very far away.
Friendly fire with rockets
Besides being caught in a blast, enemies can also take friendly fire if the rockets impact them instead of your colonists.
You can increase the chance of this happening by having the rocket travel over as many enemies as possible through aligning your distractors.
Rescue
When a colonist is downed or severely injured, drag them out of the fight immediately. Don't leave them there otherwise they risk dying from stray bullets or blood loss. You don't really need to send them directly to hospital; just drop them off somewhere outside of active combat.
Colonists lying outside cover are riskier to rescue. Choose the right time to pull them out, using your best-protected colonists, and don't let anyone near at other times.
You should have a few rescue members stand near a fight to pull out downed colonists. Non-combatant doctors should be drafted to stand near the medicine storage to allow them to quickly grab medicine for treatment.
Evacuating colonists away from the downed prevents them from receiving further fire until being rescued.
If a colonist cannot reach the hospital in time (~2 hours from death or less), have them immediately lie down at a temporary sleeping spot safely outside the battlefield, then have the doctor closest to the medicine storage go and treat the colonist ASAP. Patch colonists up a little such that they can reach the hospital without bleeding out, then carry them there. You will have a higher infection chance this way, but it's faster than having the doctor carry the colonist into the hospital.
Friendly fire management
Friendly fire is a serious issue when facing close-range attackers, especially manhunter packs. If they manage to run past your barrage of gunfire to engage your ranged soldiers, they may receive more injuries from friendly fire in the ensuing chaos than the attackers themselves. You need to be careful when directing your troops so you don't hit your own forces by accident.
Pawns can fire over the shoulders of friendlies up to 2 tiles (i.e. 1-tile space in between) away, meaning that you can have a 3-wide row of soldiers without friendly fire, which is not recommended.
- When the enemy breaks the ranks, only let the soldiers closest to melee attackers fire at them.
- Manually re-target the others to fire at another direction, repositioning them if needed.
- Disable 'Fire at will' when the enemies are closing in so they won't switch targets, potentially causing friendly fire.
- Have only 1 line of shooters so stray bullets, including bullets fired horizontally at melee attackers, will less likely hit someone.
Firing at cover
While cover works best against attacks coming straight, it's usually better to fire straight at the target instead of from an angle. If you fire straight at it, only 1 unit of cover will be effective, but if you shoot at a diagonal angle, 2 units of cover will be effective, both being capable of blocking shots, in total contributing to a higher cover effectiveness.
However, if you can get to the point where you're almost firing horizontally at the raiders, then cover becomes nearly ineffective at protecting the raider, allowing many more shots to connect. This often requires you get out of your own cover, so it's not recommended unless you can find suitable cover nearby.
For skilled medium-long range shooters it's best to shoot from a great angle to hit them from the sides.
However for not-so-good or short ranged shooters it's better to directly fire at them instead as the extra distance will make it harder to land hits, or cause the raider to exit firing range.
The below shows the difference firing angle makes on the hit chance of a pawn hiding behind cover. All values from Alpha 16.
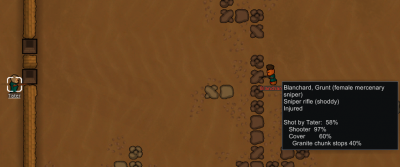
Firing straight at a raider in cover; 1 stone chunk blocks 40%.
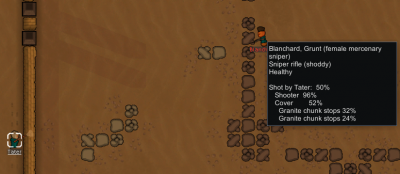
Firing at an angle; 2 stone chunks block 48% total.


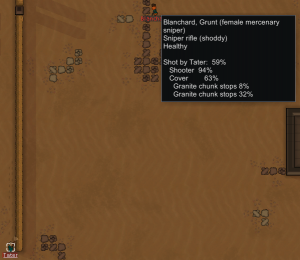
Firing at a greater angle; 2 stone chunks block 37% total.
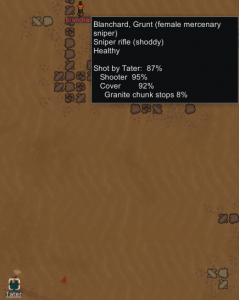
Firing almost horizontally; 1 granite chunk blocks 8% only.


Baiting
Faster, more well-protected colonists can be used to lead enemies into traps or ambushes. This is for situations when you have defenses concentrated in one direction, but the enemy comes from another.
Luring in
Enemies can be lured closer to your base by keeping your colonists out of sight, then swarming out to attack once they draw closer to your base.
This can be used to negate the range advantage of enemies.
Animals
The animals on the map, tamed or not, can be used to your advantage.
Raiders never come using tamed animals so the advantage of animals on your side is solely yours.
Tamed animal release
With your handlers, you can amass a huge army of animals to charge the enemy. Simply find a good combat-capable animal, tame it, and train it to learn Release.
There are many animals that are good for this purpose.
- Wild boars are an excellent choice as they can graze, reproduce quickly, move fast and pack a punch.
- Squirrels are a surprisingly good choice despite their low DPS and health; they are exceedingly fast and small, making them hard to hit, as well as reproduce fast.
- If you like bigger animals, you can also tame elephants or rhinos.
- Boomrats are a suitable choice if you want an army of suicide bombers. Boomalopes are also decent; though they are larger, slower and easier to hit, once they get into position their large explosions can hit a group of enemies at once.
Tamed animals also cause pirates to fire near their allies in a bid to get them off their allies, potentially causing friendly fire.
Meat shield
The animals surrounding a handler can be used as a convenient meat shield as they take bullets, arrows and other projectiles (but not explosions) for their master. Provided they don't stray too far, they won't receive friendly fire as the shooters simply fire over them. All you need is to train Obedience, instead of Release.
Strategic zoning
Raiders take their sweet time to exterminate any trace of your tamed animals on the map. This can be exploited to your advantage, as long as you're willing to have a few animals valiantly sacrifice themselves.
- Distraction: If you let your animals run all over the place, raiders may be tied up trying to wipe out the animals. This can give your colonists time to prepare, such as entering defensive positions or running to your mortars to fire a few rounds, as well as scatter the raiders making them easier to deal with. Raiders wielding rocket launchers also tend to waste them on your animals, leaving your colonists and structures mostly unharmed. However if they see better targets they will come at them instead.
- Manipulation: Animals can be moved around without the need of training Release, simply by changing the allowed zone of your animals. A short time later, the animals will move towards the zone and stay there. When animals are sleeping you can put animal sleeping spots beneath them and then remove them to wake them up.
- Aggressive zoning: Zone animals in a place where you are expecting an encounter with enemies. Enemies will notice the animals and will start attacking, making them fight back and injure or even down the attackers. This method works for any animal, even those that cannot be trained. Remember to undo the zoning otherwise the animals may starve.
- Animal chokepoint: Zone the animals in a chokepoint, creating a dense cluster.
- This is vulnerable to AoE weaponry so increase the area of the zone to make it that animals don't get too tightly together.
Aggravating animals
If you have any easily enraged wild animals (wolves, cougars, grizzlies, rhinos, etc) standing near the enemy, you can shoot them to anger them and make them charge at the enemy.
You can also opt to enrage an animal then have a fast colonist (>130% Moving) lead it towards the enemy. Some enemies will stop and engage the animal, potentially causing it to switch targets. For quite the obvious reasons it's best to equip a shield belt on the kiting colonist if he isn't the one enraging the animal.
For this, larger animals are best due to their high health and damage. A thrumbo can be considered a godsend in a raid; just send 1 straight into the raider hordes, and let 'er rip.
Smaller animals are faster and hard to hit, making them decent distraction and causing a hefty amount of friendly fire among the enemy as well.
Remember, if you can down the animal easily with colonists, so can the raiders.
Base scattering
This is a last-ditch tactic to defeat humanlike enemies if you are significantly outnumbered.
Instead of engaging them right away, let enemies scatter around the base first. After they scatter widely apart, divide and conquer, using large groups of soldiers to overcome them with ease, while others are busy demolishing other parts of your base.
Remember to patch up the base after the damage done. Coolers are especially tricky as they serve as weak points and are expensive.
Outside help
If the storyteller is feeling somewhat merciful, outside help may come to save the day.
Don't count on this however, as these rarely happen on their own, and most of the time you still need to fend off the raiders yourself.
Friendly reinforcements
Occasionally while hostiles are on the map, a friendly military caravan will come to bolster your defenses. The threats may also coincide with friendly trade caravans, visitors or passersby, who will help to engage a common enemy.
This requires you be already allied with some factions, so that they will send help of meaningful value; otherwise they may just send a few people who will quickly get downed and serve no purpose other than distraction.
Besides actual assistance, traders may also come with around 550 - 1000 points, enough to hold their own against a smaller raid. This allows you to have decent fire support around half the time, simply by calling in 1 trade caravan once every day (assuming alliances with all 4 non-pirate factions). It costs goodwill (or silver pre-0.19) but allows you to trade, as well.
You may also call for additional help at a cost of -20 goodwill. This can be repaired by diplomatic gifts, or rescuing and treating downed friendlies.
Common enemy
If mechanoids, manhunters or another enemy faction show up, raiders may stop to engage them. This causes losses to both groups of enemies, making it easier to pick off the stragglers.
If there are unopened ancient shrines you can open them, which may contain artifacts, mechanoids, confused spacers, all useful against raiders, or none of the above.
Using the psychic animal pulser is essentially invoking this tactic, but you need to be very careful when using it.
Environmental hazards
Very rarely, when unable to put a proper fight, you can count on Mother Nature to play for your side. Invaders will come to you without proper protection against the weather. You will be able to fend off the attack without confrontation.
Choosing to play on an extremely hot or cold map, such as in a sea ice biome near the poles, seals the fate of all raiders foolhardy enough to come.
Siege flees from Toxic fallout and hypothermia.
Free prisoners in bulk.


Mobile warfare
For early-mid game threats where you aren't grossly outnumbered, you can use mobile tactics to defeat raiders rather than staying put behind your static defenses.
Flanking and Surrounding
To flank enemies, have some defenders approach enemies from the sides or the back instead of concentrating fire on the front. To surround them, attack from all sides.
Enemy ranged units often stay in the same spot when engaging your colonists, and they tend to have effective cover facing one direction only, making them vulnerable to flanking. Flanking enemy ranged units can distract them and cause them to lose their cover advantage with attacks coming from multiple sides. While this makes you lose the advantage of high-quality cover, it is balanced out by the enemy's loss of cover.
This works best against entrenched ranged enemies attacking you from one side. They should be occupied with attacking frontal targets so you can creep up to them to unload lead on them from another angle. It's even better if you pair with melee to tie them up, buying time for your soldiers to get into position and preventing them from moving into new positions.
Rounding up any fleeing survivors also becomes easier if you have someone (especially melee fighters) blocking off escapes from behind.
Moving in
While moving in you need to make sure you stay far enough away from enemies, and directly right-clicking on the destination will nearly always result in a path that crosses with the enemy.
This can be overcome by shift-clicking to form a path for the pawn to follow, making sure to keep sufficient distance.
Shield belts, drawing enemy fire from a different direction, or simply using walls and terrain to block projectiles are all good ways to move in.
Wide arc flank
This tactic is about scattering your fighters in a wide arc facing your enemies. Rather than huddling together behind continuous lines of cover such as lines of rock chunks, each soldier should be taking cover on their own, and be able to shoot straight at the enemy without anyone else in between.
This gives more flexibility in positioning as well as greatly reduced vulnerability against explosives or collateral damage. Engaging your flankers also results in enemy fire being scattered, so focus fire won't take down anyone easily.
You can deploy shielded colonists to draw fire effectively from your gunners, though they need to be arranged carefully so as to be able to tank without taking friendly fire.
Perfect against preparation raids or in-construction siege camps when you can't use your static cover and they won't directly attack your base upon arrival. However if the enemy has a significant cover advantage (such as sandbags) then this tactic may not work out in your favor.
Melee tactics
Melee soldiers are a useful asset in your colonies, if used correctly. They can bring disruption against ranged enemies, or fight off invading brawlers charging into your lines.
Ranged attackers shooting behind cover from a distance could be a pain to deal with for your own ranged forces, while melee attackers can get close enough to deal heavy damage to the ranged defenders.
It's best to equip your melee colonists with Shield belts and good armor to protect against heavy fire from both sides and distract the ranged attackers. Melee attackers without the protection of shields are highly vulnerable to gunfire, even if heavily armored. Before battle, hide your melee attackers so that they remain hidden until all enemy melee attackers are engaged in battle, or put them in line in front of your gunners for quick deployment and damage absorption.
Friendly fire is a serious issue in hand-to-hand combat, as you can easily hit your own fighters.
Melee sortie
This tactic involves using a small element of melee colonists to ambush enemy ranged attackers and take the heat off your own gunners.
Sending groups of melee attackers against enemy shooters can cause great disruption, because being engaged in melee interrupts ranged attacks, prevents further attacks from occurring and lowers movement speed drastically. It can be used to take down annoying long-ranged snipers or small gunner groups, as when forced into melee they can only fight back with makeshift melee attacks with their guns, which are woefully inadequate against a dedicated brawler.
Charging at entrenched ranged attackers also diverts their attention from your own entrenched forces to your charging brawlers.
Melee rush
Melee rushing is the tactic of sending your melee attackers to engage hostiles all at once, rather than focusing on shooting them down or sending small parties to take down troublesome enemies.
Melee rushes can work alone, especially with quality equipment; well-equipped melee rushes can hold off an attack and cause raiders to flee despite being slightly outnumbered. They also attract a great deal of friendly fire from the pirates, as they try to shoot down your brawlers, hitting their allies in the process.
If you aren't afraid of friendly fire, it can be combined with a firing squad from a distance for devastating effects. The brawlers cause chaos within the raiding party while the firing squad lays fire to destroy them while the raiders are trying to cope with your brawlers.
Peeling
If a vulnerable gunner is under attack by melee attackers, you can 'peel' them away using your brawlers. Have them engage the melee attackers, who will then focus on your brawlers, allowing your gunner to get to relative safety.
Trained animals automatically peel for their assigned masters, if 'Release animals' is Off. The animals will attack any hostiles coming close rather than straying off to attack distant targets.
Setting 'Release animals' to On right when a colonist in distress near the trainer causes the animals to swarm the attacker, peeling them off.
Peeling is a relatively high-risk activity, as you are trying to put a pawn at risk in return for allowing a pawn at greater risk to escape. Peeling pawns should be expendable or decently armored.
Self-defense
Even though they aren't as good as dedicated melee weapons, guns still hurt in melee combat, even surpassing some low-quality melee weapons. This allows shooters to have a fighting chance against melee enemies.
Shooters can fight off small animals quite easily with melee, so have them fight back instead of letting the animal chew them to death.
Melee attacks with guns are a viable alternative if your colonists are adept at melee combat and the guns don't fare well at touch range. Since they don't usually emerge victorious from a 1v1 melee fight unless there is a massive skill gap, have someone else join in the fray, be it a brawler or gunner.
Hit and run
Against slow or static targets you can employ this to weaken them. You will need several fast-moving long-ranged colonists, possibly with charge lances or bolt-action rifles. Have them move within range to fire, quickly exiting range once the enemy returns fire. Repeat until conditions are no longer safe to conduct this attack, such as enemies entering full aggression and charging.
Effective against siege camps and preparing raiders for they tend to stay put at their location until they are aggravated into attacking.
Kiting
This risky and situational tactic is effective when employed correctly.
It involves the use of fast colonists (with 120-140% or more Moving) running near moving enemies to gain their attention. Constantly outrun them while staying within their attention range, if not the enemy will engage other targets instead. After running far enough, fire a few shots at them before running again. This way, kiters can distract a group of enemies by leading them around the map, while chipping away at their health.
As long as your colonist safely outruns hostiles, you're fine. However, if the enemy catches up, your colonist will be slowed and on his own.
Equipment
A fast, long-range weapon is safest (e.g. assault rifle), while a fast moderate-range weapon (e.g. machine pistol) may be used but is riskier. Slow weapons such as sniper rifles are not recommended as the need to stand still for extended periods puts soldiers in grave danger.
Kiting colonists should be lightly armored while still maintaining a fast speed.
Main PAge
 |
|||
|---|---|---|---|
|
RimWorld is an indie space colony management game developed by Ludeon Studios, a Montreal-based game studio founded by Tynan Sylvester. The current stable version is Version/Current version. For info on all releases, see the Ludeon development blog.
|
|||
Announcements |
||
|---|---|---|
|
Was wondering if an announcements section is a good idea on the page?
| ||
Basics and Concepts |
Game Objects |
|||
|---|---|---|---|---|
|
|
|||
- Orders
- Deconstruct • Mine • Haul things • Cut plants • Harvest • Chop Wood • Hunt • Slaughter • Tame • Uninstall • Claim • Strip • Rearm Trap • Open • Plan (Remove Plans)
- Zone/Area
- Stockpile zone • Dumping stockpile zone • Growing zone • Allowed area • Home area • Build roof area • Remove roof area • Snow clear area
- Structure
- Animal flap • Autodoor • Bridge • Column • Door • Fence • Fence gate • Wall
- Related
- Roof
- Production | Neolithic
- Art bench • Brewery • Butcher spot • Butcher table • Campfire • Crafting spot • Fueled stove • Fermenting barrel • Simple research bench
- Medieval
- Fueled smithy • Hand tailor bench • Stonecutter's table
- Industrial
- Biofuel refinery • Deep drill • Drug lab • Electric crematorium • Electric smelter • Electric smithy • Electric stove • Electric tailor bench • Fabrication bench • Hi-tech research bench • Hydroponics basin • Machining table • Nutrient paste dispenser (Hopper)
- Furniture
- Animal bed • Animal sleeping box • Animal sleeping spot • Bedroll (Double) • Plant pot • Sculptures (Small, Large, Grand, Terror
 ) • Sleeping spot (Double, Baby
  ) • Stool • Table (1x2, 2x2, 2x4, 3x3) • Torch lamp • Urn • Animus stone
  • Darktorch • Fungus darktorch • Crib
 - Complex Furniture
- Armchair • Bed (Double) • Dining chair • Dresser • End table • Royal bed • Shelf (Small) • Brazier (Darklight ) • Drape • Grand meditation throne • Meditation throne • Slab bed (Double) • Baby decoration • Blackboard • School desk • Toy box
- (research)
- Hospital bed • Standing lamp • Sun lamp • Bonsai pot
- Power
- Power conduit (Waterproof) • Power switch • Wood-fired generator • Chemfuel powered generator • Wind turbine
- (research)
- Battery • Geothermal generator • Solar generator • Watermill generator • Toxifier generator
- (uncraftable)
- Vanometric power cell • Unstable power cell
- Related
- Ship reactor
- Security
- Barricade • Sandbags • Spike trap
- (research)
- Autocannon turret • Foam turret • Mini-turret • Rocketswarm launcher • Uranium slug turret • Mortar
- IEDs
- IED trap • IED incendiary trap • IED EMP trap • IED firefoam trap • IED smoke trap • IED antigrain warhead trap • IED tox trap
- Related
- Antigrain warhead • EMP shell • Firefoam shell • High-explosive shell • Incendiary shell • Smoke shell • Tox shell
- Misc
- Caravan hitching spot • Egg box • Grave • Marriage spot • Party spot • Pen marker • Sarcophagus • Tool cabinet • Meditation spot • Nature shrine (Large, Small)
- (research)
- Comms console • Cryptosleep casket • Firefoam popper • Ground-penetrating scanner • Long-range mineral scanner • Moisture pump • Multi-analyzer • Orbital trade beacon • Pod launcher • Stele (Large, Grand) • Transport pod • Vitals monitor • Ship landing beacon
- Floors
- Burned floors (Carpet, Straw matting, Wood floor) • Concrete • Flagstones (Sandstone, Granite, Limestone, Slate, Marble) • Gold tile • Paved tile • Silver tile • Steel tile • Sterile tile • Straw matting • Wood floor • Fungal gravel • Hex tile • Spikecore plates • Totemic boards
- (research)
- Carpet • Stone tiles (Sandstone, Granite, Limestone, Slate, Marble) • Fine carpets • Fine stone tiles (Sandstone, Granite, Limestone, Slate, Marble) • Hex carpet • Mindbend carpet • Morbid carpet • Morbid stone tiles (Sandstone, Granite, Limestone, Slate, Marble) • Spikecore stone tiles (Sandstone, Granite, Limestone, Slate, Marble) • Totemic stone tiles (Sandstone, Granite, Limestone, Slate, Marble)
- Floor coverings
- Animalist slab (Medium, Broad) • Morbid slab (Medium, Broad) • Rustic rug (Medium, Broad) • Spikecore floor-star (Medium, Broad) • Totemic slab (Medium, Broad)
- Related
- Bridge • Smooth stone
- Recreation
- Horseshoes pin (Colony) • Hoopstone ring (Tribal) • Game-of-Ur board (Tribal)
- Complex Furniture
- Billiards table • Chess table (Colony) • Poker table
- (research)
- Tube television • Flatscreen television • Harp • Harpsichord • Piano
- (trade)
- Megascreen television • Telescope
- Related
- Snowman
- Ship
- Ship structural beam • Ship cryptosleep casket • Ship computer core • Ship reactor • Ship engine • Sensor cluster
- Temperature
- Campfire • Heater • Cooler • Passive cooler • Vent