Difference between revisions of "Quests"
| Line 152: | Line 152: | ||
| [[Jade]] || 20 - 25 || 700 - 875 || 350 - 438 | | [[Jade]] || 20 - 25 || 700 - 875 || 350 - 438 | ||
|} | |} | ||
| + | |||
| + | |||
| + | For [[pack animal]]s: [[Elephant]]s have the highest carrying capacity at 140 (kg) and [[Alpaca]]s have the lowest at 35 (kg) | ||
| + | |||
| + | Steel at 1200 (kg) you'd need 8.5714 Elephants OR 34.2857 Alpacas. | ||
| + | |||
| + | This does not include carrying capacity from any colonists. As the number of colonists on a mining mission can be a small or very large number and this doesn't take into account any injuries that might minimize capacity. Nor does this include the possibility of [[pod launcher]]s and the ability to launch resources back to base. | ||
| + | |||
=== Retrieval team === | === Retrieval team === | ||
Revision as of 03:24, 13 July 2021
|
| This article is a stub. You can help RimWorld Wiki by expanding it. Reason: Please add a reason . |
| This article is suggested to be rewritten. Reason: Outdated in places, very rough and very incomplete.. You can help the RimWorld Wiki by improving it. |
Quests are a class of event that provide conditions to be met or actions to be performed to gain a reward. Generally they are offered by Factions but can also be offered by individual pawns or even unaligned AI's. The rewards vary from the weapons and gear, resources, goodwill with the offering faction, honor ![]() , or even new colonists or just the loot at the location of the quest. The quests can require actions at the player's colony, at specially generated sites on the world map, or at faction settlements.
, or even new colonists or just the loot at the location of the quest. The quests can require actions at the player's colony, at specially generated sites on the world map, or at faction settlements.
Most quests must be accepted, however some are automatically given to the player. Some quests have requirements to be accepted and some have a time limit for acceptance. Quests can also be rejected however they can still be accepted until their acceptance time limit expires in case of mistake or mind changing. Offered, Accepted and Past (including failed, rejected and completed quests) quests can be viewed in the quest tab.
Rewards
Rewards can be a variety of things. Sometimes the reward will be set, sometimes the player will be able to chose from one of three options. These quests often offer goodwill with the offering faction as one option, if one exists and if that option has not been disabled in the tab. If a player is not interested in improving goodwill from a given faction, it is important to disable this option so that more choices for rewards are offered and the chances of getting something needed is increased.
Sometimes no reward is offered, instead resolving the quest is the reward. Examples of this include:
- Resolving Effectors, such as psychic droners or weather control at an world map location
- Maps where the "reward" is the loot available at the the map
- Decrees by Nobles
 , which prevents the Noble from getting upset.
If the reward is a pawn, sometimes the icon can be clicked on to see their stats. Sometimes this is not an option as a way of introducing extra risk to accepting the quest.
Factions with poor relations to the colony will exclusively offer Goodwill quests as a way to get back into their good graces. Similarly, Peace Talks quests will only occur when Hostile.
Some items can only be obtained through quest rewards, such as Vanometric power cell and Infinite chemreactors, others are rare outside of quests such as Archotech arms, Archotech legs, and Archotech eyes.
Bandit camp
A nearby base is troubled by pirates setting up camp near them, and asks you to take them out in return for improved relations and some payment. Once the bandits are defeated, the base itself may also be claimed and looted/disassembled for loot, along with whatever its defenders were carrying.
The pirates in these bases start unaware of your attack team, until your team attacks them or gets too close to them. Once either occurs, they'll turn and assault your team as normal. Like pirate assaults on colonies, the defenders will break and flee towards the map borders once a sufficient percentage of them are killed or downed.
These bases can also have turrets, but these are typically powered by solar arrays, with or without batteries. Both solar arrays and batteries can be taken out from a distance using long-range weapons like sniper rifles, disabling the turrets without risking return fire. This also allows the turrets to be collected as loot.
Occasionally, these bases will have manned mortars. However, if the person manning the mortar is defeated or otherwise incapacitated (example, using a Psychic insanity lance or Psychic shock lance on them), no other bandits will attempt to man the mortar, effectively disabling it entirely.
Prisoner rescue
A prisoner is held by the enemy(though walks around). Once the enemies have been killed, click a colonist, right click the prisoner, and click "offer help". The camp only lasts a short amount of time.
Analyse whether you like the prisoner
If you do, just getting in range will do. If you don't, just leave him/her there.


Retrieval team
This is a straight-up combat mission. Bring food and combat pawns with good weapons to fight off the enemies guarding the site.
Strategies
You may wish to bring extra gear to equip the prisoner with once they are released.
The site tends to be guarded by at least one automatic Mini-turret. However, the defenses are usually powered by a Solar generator. Destroying the generator (or the power conduits leading from it) will cripple the defenses. Alternatively, attack the site at night; there are no batteries to store energy, so they shut down in darkness.
Once the site is cleared, you may wish to spend some time stripping the site of everything valuable before leaving. Besides fallen enemies and their items, the Sandbags, Mini-turret, Solar generator, and the walls and floors can be deconstructed or uninstalled to salvage resources to take home.
Trade request
A nearby faction base requests a delivery of a number of specific items and will give payment after delivery is complete. You will need to gather up those items and deliver them before the time limit is up. The offered reward is always worth significantly more than the requested items.
Anything of the listed quality or better will work. The amount of health remaining does not matter.
For clothing, tainted apparel is not accepted.
Patchleather will never be requested.
Item stash opportunity
The faction leader notifies you of an item stash nearby, and may warn you of any danger present. If you don't take the stash, others will take it. The stash holds valuable items and artifacts.
Retrieval team
Your retrieval team should include fighters as there may be danger near the item stash, if threats are either present or unknown.
Peace talks opportunity
A hostile faction leader plans a peace talk with your faction at the location. You need to send a negotiator to the location to begin negotiations to improve relations.
You will obviously want to bring the best negotiator your faction has to offer as doing so improves chance of good outcome. You should have a few guards come along to fight off ambushes, especially if the peace talks turn out disastrous and you get ambushed.
Bringing along prisoners to release has no effect on the outcome.
Outcome chances
The actual outcome chances are dependent on the negotiator's Diplomacy Power stat, after going through a simple curve. To do this, the game calculates the bad outcome factor, of the negotiator first.
- At 0% power, the bad outcome factor is 4.
- At 100% power (healthy, lvl 10 Social), the bad outcome factor is 1.
- At 150% power (healthy, lvl 20 Social), the bad outcome factor is 0.4.
The new weight of each outcome is calculated afterwards.
- Triumph = 0.1 * ( 1 / Bad Outcome Factor)
- Success = 0.55 * ( 1 / Bad Outcome Factor)
- Flounder = 0.2
- Backfire = 0.1 * Bad Outcome Factor
- Disaster = 0.05 * Bad Outcome Factor
The sum total of the new weights is then calculated.
Finally, the probability of each outcome is calculated:
| Probability of each outcome = New Weight ÷ Sum Total of Weights |
Example
Take a level 15 Social negotiator as an example:
- The diplomacy power is 125%, corresponding to a bad outcome factor of 0.7.
- The new weight of each outcome, to 3 d.p.:
- Triumph = 0.1 * ( 1 / 0.7) = 0.143
- Success = 0.55 * ( 1 / 0.7) = 0.786
- Flounder = 0.2
- Backfire = 0.1 * 0.7 = 0.07
- Disaster = 0.05 * 0.7 = 0.035
- The sum total of new weights is calculated:
- 0.143 + 0.786 + 0.2 + 0.07 + 0.035 = 1.234
- Finally, the probability of each event, to 2 d.p.:
- Triumph = 0.143 / 1.234 = 11.58%
- Success = 0.786 / 1.234 = 63.69%
- Flounder = 0.2 / 1.234 = 16.21%
- Backfire = 0.07 / 1.234 = 5.67%
- Disaster = 0.035 / 1.234 = 2.84%
Precious minerals found
Spawned by using the Long-range mineral scanner. Similar to the item stash quest, except a lump of ore is spawned that requires mining. The ore lump will be as follows:
| Resource | No. of Tiles | Total Yield | Total Mass (kg) |
|---|---|---|---|
| Steel | 55 - 60 | 2200 - 2400 | 1100 - 1200 |
| Plasteel | 10 - 15 | 400 - 600 | 100 - 150 |
| Components | 50 - 70 | 100 - 140 | 60 - 84 |
| Silver | 60 - 80 | 2400 - 3200 | 16.8 - 22.4 |
| Gold | 8 - 12 | 320 - 480 | 2.5 - 3.8 |
| Uranium | 15 - 20 | 600 - 800 | 600 - 800 |
| Jade | 20 - 25 | 700 - 875 | 350 - 438 |
For pack animals: Elephants have the highest carrying capacity at 140 (kg) and Alpacas have the lowest at 35 (kg)
Steel at 1200 (kg) you'd need 8.5714 Elephants OR 34.2857 Alpacas.
This does not include carrying capacity from any colonists. As the number of colonists on a mining mission can be a small or very large number and this doesn't take into account any injuries that might minimize capacity. Nor does this include the possibility of pod launchers and the ability to launch resources back to base.
Retrieval team
Your team must include miners who can extract the minerals from the lump of ore. Since not all threats are picked up by the scanner, it's best that your miners are capable of combat to eliminate threats whether or not any is detected.
For non-small volume minerals, you will need pack animals to help carry them. Drill arms ![]() installed on your miners will significantly the mining time and thus the risk faced by both your miners and your undermanned home base.
installed on your miners will significantly the mining time and thus the risk faced by both your miners and your undermanned home base.
Journey offer
This quest is one of the victory conditions of Rimworld: to get of this hellish planet. Unlike most other world quests, this is played out on a map with a size similar to that of your bases. In the middle of that map is the ship with a powered-down core, which takes 15 days to activate and during that time will attract lots of danger, similar to building your own ship or doing the stellarch quest ![]() .
.
Setting off
You will need to prepare for your long distance journey to the ship. If you don't plan on expanding the ship you can only bring up to 18 colonists to leave the planet.
To bring as much food as possible, make pemmican, as it's light yet energy packed, perfect for long distance travel. If you need to travel for longer than 75 days, you will need to bring packaged survival meals as well as these last indefinitely.
Journey offers tend to spawn as far away as possible, meaning you will need to pack food for years. Colonists are unable to carry that much food on themselves to sustain them for that long, so you will either need to set up camp to forage/plant food, or bring pack animals with you.
Trading for supplies
A viable alternative to bringing massive amounts of food is to bring more valuable items instead, then barter for supplies as you slowly proceed towards the ship. With light yet valuable items such as drugs, you can carry a lot more worth with you.
Carrying lots of high-value items will attract pirates so be well-guarded.
Base hopping
A more time-consuming method of reaching the journey destination is to bring less, but settle down regularly to restock on supplies.
If you plan on growing food, it's best to settle days before the growing season to make the most out of it. Also do so before you completely run out of food, for you need time to set up and grow/ gather food.
Keep in mind that raids and other events will happen should you decide to settle down. Not that caravans are risk-free either.
Settling down
Once you party reaches the ship you will need to power it up before it can function. You will need to survive 15 days before you can leave.
Base building
While the ship starts up, your colonists will require a place to live. Given the near constant combat and the effect it can have on the mood of colonists, it can be beneficial to bring along or produce sculptures and recreation items to improve their stay.
Before turning on the ship core, build a large stone wall surrounding the ship. In the walls, your pawns will require a place to sleep and eat as well as storage for items. Bedrooms and separate combined dining/recreation room provide the optimum mood, but a combined barracks/dining room/recreation room can allow high room quality mood buffs with a minimum of investment. A separate clean room for use as a hospital is also recommended.
It is generally advisable to stockpile sufficient food so as to not have to grow or cook food during the start up sequence. However, a freezer may be useful - such as to store fine and lavish meals for an easy mood buff. Alternatively packaged survival meals or even pemmican can be used to do away with the need for refrigeration at all.
Defenses
You need to defend the ship from enemies who will attempt to demolish the ship parts and perhaps steal the materials. Treat it as if you are defending a base, with something important inside.
Since enemies won't come until you start up the ship core, you can take your time to set up.
Ship expansion and construction
You can expand the ship by adding additional cryptosleep caskets for colonists to hibernate in. This is useful for saving some materials overall in building the ship, but you'll need to figure out how to get the necessary materials there- set up bases nearby, mine the resources in the map (which generates as a regular 'base' map so minerals do spawn), or do it the good old way with muffalo.
The ship also comes with 1 extra engine, which can be deconstructed for resources.
Survival
Defend the ship as how you would defend your base. If you can, you can bring pre-built mini-turrets and even bring the materials to build autocannons or uranium slug cannons.
Cryptosleep survival
You can put unnecessary colonists to sleep inside the caskets to save resources. If you are more hardcore you can also have everyone hibernate there, as ship cryptosleep caskets allow you to eject colonists manually, and wake them up only to defend. This does mean that colonists will be afflicted with cryptosleep sickness, hampering their combat effectiveness when they need to rise to defend the ship.
Threatened Joiner
Threat is chasing a pawn. If accepted the pawn will join, and the threat will come soon after. If the pawn is left outside, and the threat can kidnap them, they'll leave with the pawn.
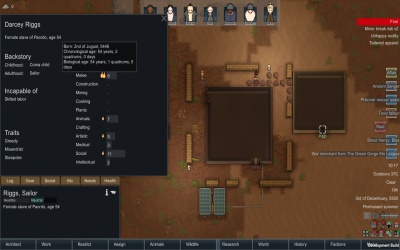
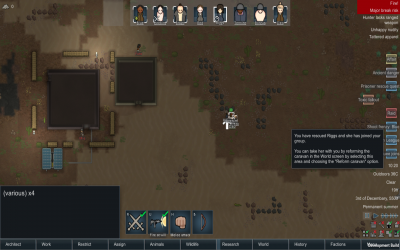
Downed Refugee
Pawn is downed on world map site. Once there, if you want to recruit them, click a colonist, right-click the pawn, and click offer help.
They are not part of any faction, meaning taking them prisoner, letting them die, or killing them, will not affect any diplomacy.
Ferried bandit camp
| This article relates to content added by Royalty (DLC). Please note that it will not be present without the DLC enabled. |
<ENEMY FACTION> have set up a camp and are harassing caravans of <QUEST GIVER FACTION>. <QUEST GIVER> is planning an aerial assault on the camp, which is guarded by <NUMBER> <ENEMY TYPE>. <QUEST GIVER PRONOUN> wants you to provide soldiers to carry out the attack. <QUEST GIVER PRONOUN> will send a shuttle to pick up your fighters, bring them to the attack site, and take them home afterward. They will be fed en-route. Once the attack begins, you must defeat all enemies and turrets within <DURATION> - Quest description
Identical to a normal bandit camp. An NPC noble wants you to take out a camp of bandits, and will ferry your soldiers there in a shuttle. You must provide a specific number of soldiers for the quest, and the shuttle will not launch without that exact number in it. The location is generally much too far away (~150+ world tiles) to be able to support the team with additional troops normally. The soldiers will be fed en route, and are given a generous time limit (several days) to take out the bandit camp. The same shuttle will ferry them back. Travel time takes only an in-game hour or so in either direction.
Also, unlike a normal bandit camp, the bandits will typically begin attacking your team of soldiers within a few minutes of landing, even if your soldiers have not attacked them or gotten near them yet.
Nota bene: If honor is chosen as a reward, only a pawn that participated in the attack can be given it.
Problem Causer
| This article relates to content added by Royalty (DLC). Please note that it will not be present without the DLC enabled. |
A world map location is created with a condition causer. The condition causer will create one of a variety of nominally detrimental effects in a radius that always includes your map tile. It will continue to do so until destroyed. See condition causer for details on the effects.
Decrees
| This article relates to content added by Royalty (DLC). Please note that it will not be present without the DLC enabled. |
Nobles in your colony may issue wild decrees that demand an action to be done. If their decree's requirements are not met, they will become increasingly unhappy, though they will eventually forget about the decree or declare it impossible. The exact requirements for these outcomes are currently unknown. Satisfying a decree will give a +6 mood buff for 15 days with a stack limit of 3, while a decree failing will create a -4 mood penalty, also for 15 days also with a stack limit of 3.
Decrees may be to:
- Produce a certain amount of certain common resource, such as steel, wood or cloth. You are allowed 5 days to do this.
- Havest a certain amount from a cultivatable plant. Only plants with a Grow Days stat of 10 or less are selected. You are allowed a number days equal to 2x the chosen plants grow days + 8 to do this.
- Hunt or slaughter a certain number of a specific type of animal. You are allowed 5 days to do this.
- Build a monument. You are allowed 15 days to do this.
Noble Wimp
| This article relates to content added by Royalty (DLC). Please note that it will not be present without the DLC enabled. |
<PAWN NAME>'s <NEW TITLE> Ceremony
| This article relates to content added by Royalty (DLC). Please note that it will not be present without the DLC enabled. |
<EMPIRE NAME> is ready to grant <PAWN NAME> the title of <NEW TITLE> and the power of a level <NEW PSYLINK LEVEL> psylink in a bestowing ceremony. The bestower will arrive by shuttle and perform the ceremony. The bestower will only give a title if any throneroom requirements are satisfied. You can betray the bestower to steal psylink neuroformers, but this will make <EMPIRE NAME> your enemy. If you miss or fail this ceremony, there will be another opportunity later. If the bestower or guards are harmed for any reason, there will be diplomatic consequences. - Quest description
Spawns a Bestower and several guards to officially grant a pawn a title and give the earned levels of Psylink. For Acolyte and above, accepting the quest requires a Throne Room that meets the new title's requirements and there cannot be pawns enemies with the Empire on the map. The bestower must also be able to reach the throne room, or for the Yeoman ceremony, generally the recreation room or similar. If a Party Spot has been designated, that will be the location the bestower uses for Yeoman ceremonies. The map must also be a safe temperature. If any of these prerequisites is not fulfilled before the bestowing ceremony completes, the bestower will be "angered by the interference" and will leave, failing the quest. The quest will naturally reoccur again later, usually within a few seasons.
Provided the pawn to be bestowed does not already have an equal or higher psylink level to their new title, the bestower will spawn with 2 Psylink neuroformers, so killing or downing them can allow them an additional level of psylink to be gained, at the cost of making an enemy out of the powerful Empire faction. It's also possible to instead simply arrest the bestower and guards, rather than attack them. They can then be looted for the neuroformers, then packaged into drop pods and sent back to an imperial faction settlement as a "gift" with some additional items to effectively buy back the lost faction standing. The bestower and guards can also be harvested for their bionic parts first, if they have any (the bestower can spawn with archotech parts).
<PAWN NAME>'s Inheritance
| This article relates to content added by Royalty (DLC). Please note that it will not be present without the DLC enabled. |
If a pawn with a royal title of yeoman and above dies, their designated heir will inherit their title. Their heir is randomly chosen, with extra weight given to the person's spouse.
Refugee Hospitality
| This article relates to content added by Royalty (DLC). Please note that it will not be present without the DLC enabled. |
The quest states that a certain amount of refugees have escaped some bad event (i.e. slave caravan, home being destroyed), and that the refugees wish to take shelter in your colony for a certain amount of time.
They are willing to work for you, and there is no diplomatic consequences for what you do with them, because they belong to no faction. There is the possibility of a "future reward" (more research needed). But the main reward is the extra labor.
The pawns skills and traits can vary from a very solid colonist to the most crippled unskilled pyromaniac you could get. They do come with weapons and clothing, usually in poor quality and condition. Nota bene: Remove any and all equipment you care about from them before the quest ends. Because once the timer ends, you lose control of them, and they will leave the map, holding whatever they had before leaving.
There is an incentive to keep them somewhat happy, other than preventing mood breaks, which is that if they are are overall happy for a certain amount of time (needs testing to determine the average and chances), they will be willing to join your colony. At which point, you can chose to accept them, refuse them, postpone, or "jump to them" (can be used to close window, and keep notification). A trick is to wait about half a day (depending on how many pawns are refugees), and strip them of what you want while having them drafted and near the map edge. You seem to be unable to set their clothing policy, so they will try to put on any non-restricted clothing nearby if undrafted.
Complications
Sometimes complications will arise. This can include counter offers from other factions or the refugees secretly being infiltrators.
Counter offer: This may include another message after accepting the refugees from an a faction may appear offering a reward should you kill the refugees. This message will not appear in the quest tab. There is no downside to doing so besides missing out on the chance of a reward from the refugees, which can be significant but also may not come at all, and the chance to recruit some of them. There is no need to accept this offer, just kill all the refugees before the hospitality quest ends. Make sure you at least turn them hostile - getting them killed otherwise is not sufficient to earn the reward.
Infiltrators: The refugees may turn out to be infiltrators- they will suddenly turn hostile and attack. If they only have the equipment they came with they will likely be more a nuisance than a threat, but it can occur at an inopportune time.
An interesting discovery is that the outcome of the quest can be predetermined when accepting the quest. If the refugees will remain friendly throughout their stay, the quest will list a time for the guests to depart in the top right hand corner of the quest box. However, if the refugees will betray the colony, there will be no such time. Thus the player can accurately predict, and plan for, the behavior of the refugees.
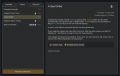
A friendly group of refugees - Note: "Guests Depart" in top right hand corner.
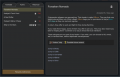
An insidious group of refugees - Note: No "Guests Depart" in top right hand corner.


Host Royals
| This article relates to content added by Royalty (DLC). Please note that it will not be present without the DLC enabled. |
You are asked to host a certain number of imperial royals for a certain number of days. These imperials may have titles which cause them to want meditation spots or a certain quality of room. They generally are not willing to do labor while hosted. The quest requires that the imperials be kept above a certain mood threshold for their stay, and obviously protected from being killed. Giving them good quarters, feeding them high-quality meals, and otherwise confining them to their rooms and beautiful surroundings such as a rec room and dining room with high impressiveness will keep their mood high, and also keep them safe from injury.
A variant of the quest requires you to host a number of imperials all infected with blood rot. This disease is difficult and expensive to cure, so the imperials will need regular medical care to slow/reverse the progress of the disease so they do not die before the end of the quest. They typically must be hosted for more than a season (~20-25 days). Untreated, Blood Root is fatal in 2.5 days, but with good treatment a pawn can be kept alive and at the minimum disease severity indefinitely (the disease normally resolves in 30-40 days, but this is longer than the quest typically is set for). Since the disease causes pain and "sick" thoughts at higher severity levels, which reduce the mood of the imperials, they should be treated by high-skill doctors with relatively good medicine, ideally in a hospital with good treatment offset, to optimize their mood.
Pawn Lending
| This article relates to content added by Royalty (DLC). Please note that it will not be present without the DLC enabled. |
When you accept the mission, a shuttle will come by and pick up the requested amount of pawns and then leave. The pawns will go off and come back after the given amount of time has elapsed. They should come back in the condition they left (Needs more testing).
Though they should not die during their mission (could be some edge cases that need testing, such as having one with a condition that will kill them before the quest has elapsed).
Shuttle Crash Rescue
| This article relates to content added by Royalty (DLC). Please note that it will not be present without the DLC enabled. |
A shuttle of <EMPIRE NAME> has taken damage and is seeking a place to land. Its commander <COMMANDER NAME> wants to land at <COLONY NAME>. <FACTION TYPE> from <FACTION NAME> will attack the crashed shuttle site in an attempt to kill its occupants. You must defend them. The shuttle contains <COMMANDER NAME>, <AMOUNT> other civilian(s), and <AMOUNT> <DEFENDER TYPE>. The commander and civilian(s) must be rescued, but the <DEFENDER TYPE> may be sacrificed. After 8 hours, a rescue shuttle will come to pick up the survivors. You'll need to get them all on board within 12 hours. - Quest Description

A shortly after accepting the quest, a shuttle will crashland somewhere on the map, usually not far from the player's base. It is possible for it land directly on buildings or crops, destroying them and damaging things nearby. Imperials will stay near it, waiting for a rescue shuttle. When "time until rescue shuttle arrives" reaches 2-3 hours, a raid will appear on the edge of the map closest to the crash site and immediately proceed to attack landed civilians. Troopers that land with civilians will depend on the game stage - ranging from a few light troopers in flak armor to heavily-armored cataphracts with pulse weapons, and are usually able to repel early-game raids without much help from the player, though mid- to late-game raids can obliterate the whole imperial party easily. Therefore it is recommended for the player to start constructing simple defenses and equipping fighters just after the shuttle lands. If the crash happens inside the player's base area, it is possible to use superior defenses like turrets or killboxes. Mortars are ineffective and will usually be able to make just a single shot before the raiders get too close to friendlies (unless playing on a large map size), and it is usually better to have additional people on the spot.
Raiders won't pay much attention to your colonists and will instead rush to kill imperial civilians, so it is advised to guard them with melee fighters and/or trained combat animals. Imperials can be surrounded by walls or spike traps and covered by smoke to give some protection against melee/ranged raiders. The quest is failed if one of the civilians dies, with a faction relations penalty for each death and a heavier one for the commander's death. Since civilians don't carry any armor or weapons, they can quickly die from stray shots or an enemy brawler getting too close.
When the raiders start to flee, a rescue shuttle will land nearby and pick up the surviving imperials. Cargo pods containing the chosen reward (if any) will land near your base. The damaged shuttle can be deconstructed for 30 steel, 52 - 53 plasteel and 7 - 8 components. Loot from the raiders is also yours to take.
Version History
- 0.18.1722 - New world site components, Used in various situations:Sleeping mechanoids, Animal ambush, Enemy ambush
- 1.1.0 - Quest tab with information about available, active, and historical quests added
- 1.2.2753 - Trade requests will no longer request patchleather.
- Progression
- Quickstart Guides • Basics • Intermediate Midgame Guide • Advanced Endgame Guide • Ending the game
- Scenarios
- Lost Tribe Guide • Rich Explorer Guide • Naked Brutality Guide • The Mechanitor Guide

- Survival
- Extreme Heat Guide • Extreme Cold Guide • Extreme Desert Guide • Ice Sheet Guide • Sea Ice Guide • Events Guide
- Combat
- Defense tactics • Offense tactics • Weapon Guide
- Construction
- Colony Building Guide • Defense structures
- Production
- Food production • Money making guide
- Other
- Skill Training • Permadeath save conversion guide •
Ideology Min-Maxing